
Jalapeño Business
Beer label illustration for Dirtbag Ales’ Jalapeño Business. Here’s a summery of my thoughts and process on this one.
I probably shouldn’t play favorites because each beer label illustration I’ve done is special in its own way, but for now I’m just going to go ahead and call this one my favorite. I designed this one a while ago for Dirtbag Ales. When Dirtbag Ales’ Head Brewer/ co-founder, Tito told me about the name of this beer and his ideas for the label last summer, I knew immediately where I wanted to go with the design. My initial sketch was on paper and then I used a combination of Procreate (on my iPad) and Photoshop to illustrate this piece. As the scene started to develop through my drawing process, I became very attached to Mr. Super Serious Jalapeño and his annoyingly cool co-worker, the Pineapple. Even in the initial sketch their personalities were apparent and I added small details in the background to emphasize this. These characters have their differences, during the work day, I image there’s a constant battle of who’s got more flavor, and Mr. Jalapeño probably spend s a lot of time trying to get The Pineapple to focus and stop drumming pencils on the desk they share, but united in a beer, they work really well together. You can find this tasty American Wheat Ale brewed with Jalapeño and Pineapple at the Dirtbag Ales’ Brewery in Hope Mills, N.C. or contact the Brewery to find out if it’s available at any of your local grocery stores.


This was my initial sketch of the Jalapeño business label.

Produce Illustrations for Freshlist
Fruits and vegetables are at the top of my “favorite things to draw list”. I was very happy when a project in the form of fruits and vegetables came my way back in August when I got an illustration request from a Charlotte, NC based food delivery company called Freshlist.
Fruits and vegetables are at the top of my “favorite things to draw list”. I was very happy when a project in the form of fruits and vegetables came my way back in August when I got an illustration request from a grocery delivery company in Charlotte called Freshlist. One of the founders, Jesse, reached out and asked if I would be interested in illustrating produce for a giant seasonal clock he planned to have painted on the side of the Freshlist building. Of course I was interested! When it was time to start the project, Jesse sent me over a list of over 50 produce items- it was like a long grocery list but instead of delivering groceries I was to deliver persimmons, kumquats, okra, lemons, limes, collard greens and more in the form of vector illustrations. There were a few things I had never heard of like Paw Paw fruit and that took me down the rabbit hole of information, especially when I realized I could potentially find a paw paw tree in the woods near my house. I drew a few of each item on the list by hand using a .01 Pigma Micron pen. Freshlist is a company with a very down to earth organic vibe- they work directly with local farmers and food makers to deliver fresh, local food to their customers, so I wanted my illustrations to have that same feel to them. After everything on the list was drawn and approved I converted the drawings to vector and added color. These illustrations were then turned over to a local Charlotte artist who did an amazing job painting them onto the wall. The finished product is a large, colorful and functional seasonal clock. I love projects like this and it’s a great feeling to know I was able to play a role in contributing to the beautification of a community.
To learn more about Freshlist, visit Freshlist.com


Because my flowers are gone
Here’s the first of my “because my flowers are gone I will just draw them until they come back” illustrations.
We finally had our first frost here in North Carolina and it was heart breaking to see how fast my Japanese Maple dropped its’ leaves! And all of the flowers except my camellias are done for the year. Thank goodness for camellias! They’ll get me through until the spring along with a strong drive to draw flowers until the real ones return. I think that’s why there is so much floral art out there- we artists long for the wild colors, shapes and textures. So get ready- I might be producing excessive amounts of floral illustrations and patterns over the next few months. Here’s the first of my “because my flowers are gone I will just draw them until they come back” illustrations. I’ve made it available as a set of note cards (there’s also a separate listing for an individual card). Coincidentally, they go nicely with my unicorn pin!


It starts off sloppy
Read about why I’ve gone digital for most of my art, this cute Weimaraner waiting under the mistletoe card and watch the time-lapse of me drawing it.
I fought the digital transition for a long time because I REALLY love pens and paper- I love ink! But there’s a major problem with pens and me- there’s no undo. I didnt even realize this was a problem until I started drawing using procreate on my iPad with features like tap once to undo a mistake! Amazing. After a few iPad drawing sessions, when faced with ink on paper, I found myself attempting to tap to remove a misplaced line- with no luck of course! As a result I’ve been drawing exclusively on my ipad pro for a few months now. My poor pens are feeling awfully neglected- and my sketchbooks are being filled with fire trucks by my 6 year old, Miles. But I’m having too much fun to turn back. The best part about drawing digitally is that I can record my process, that’s actually the real reason I’m writing this post. I wanted to share how sloppy a drawing originally starts off. I feel like this is important because artist or not, we all start off with a sloppy sketch and more often than not, abandon that sketch thinking it’s a waste. In this video you’ll see that my initial sketch looks nothing like my final drawing. After I was finished I exported my drawing into photoshop where I finished it into a greeting card.
What do you think? If you’d like to see more of these time lapses, let me know!
Also, you can buy this and other greeting cards in my Etsy shop as a single card or as a set.


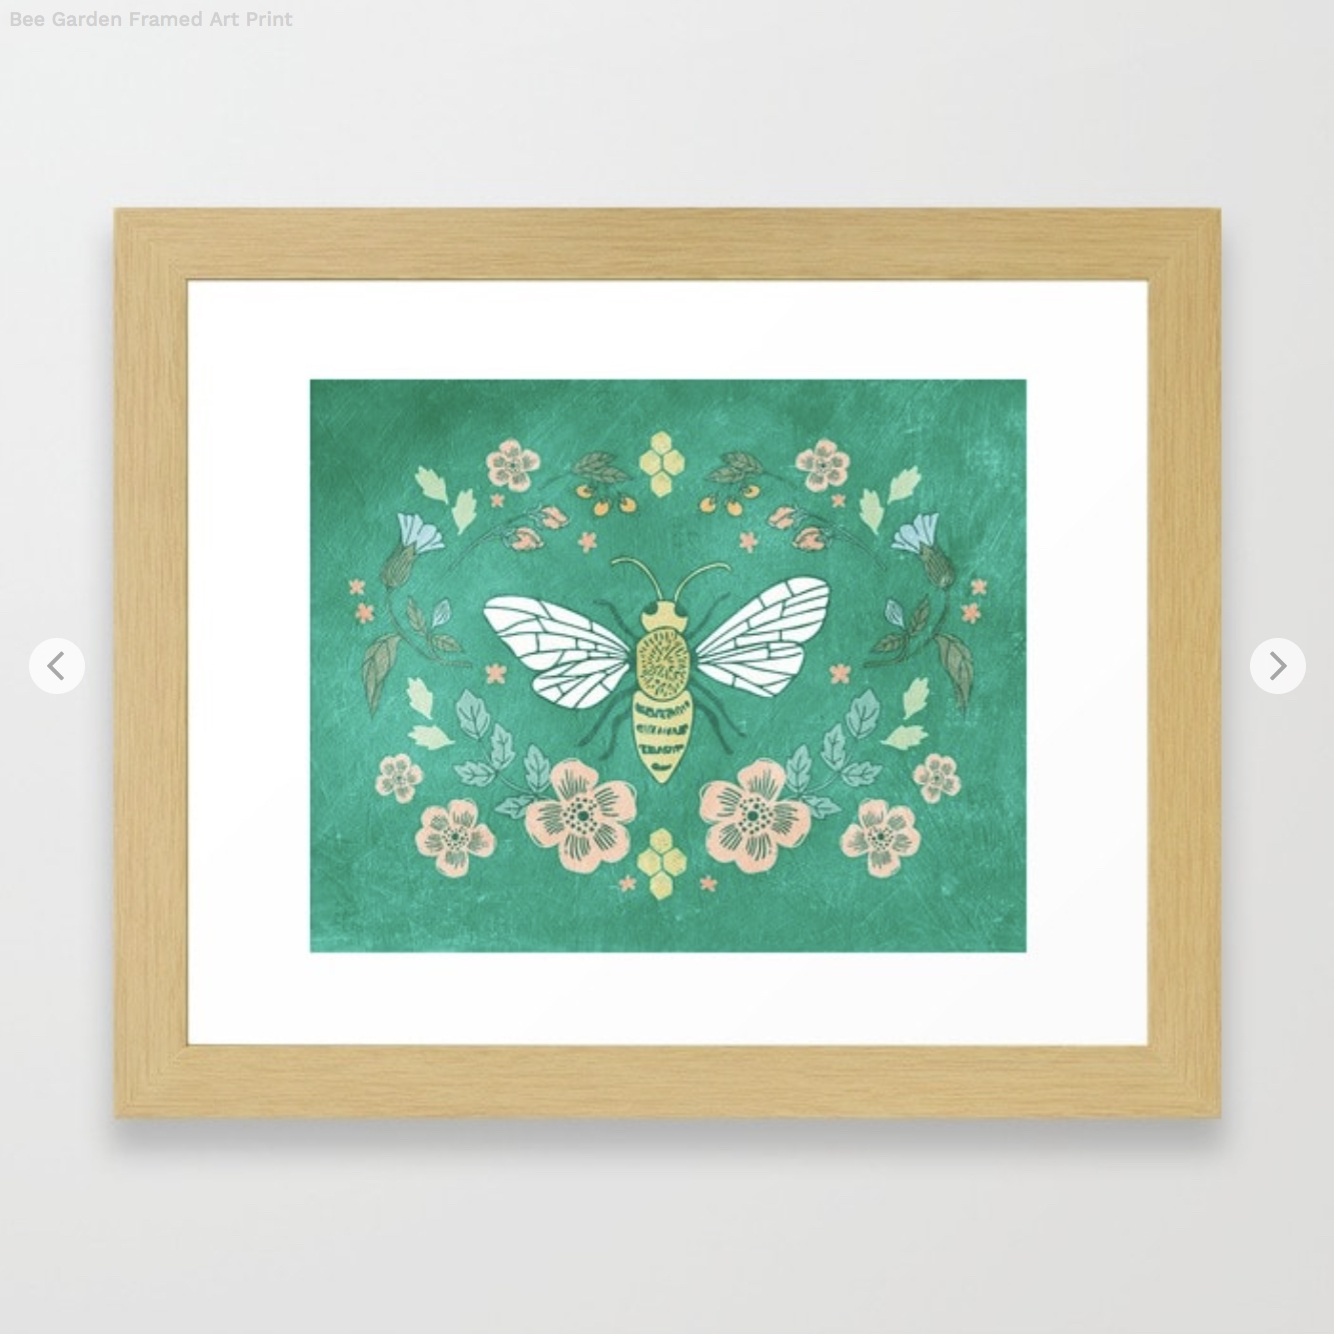
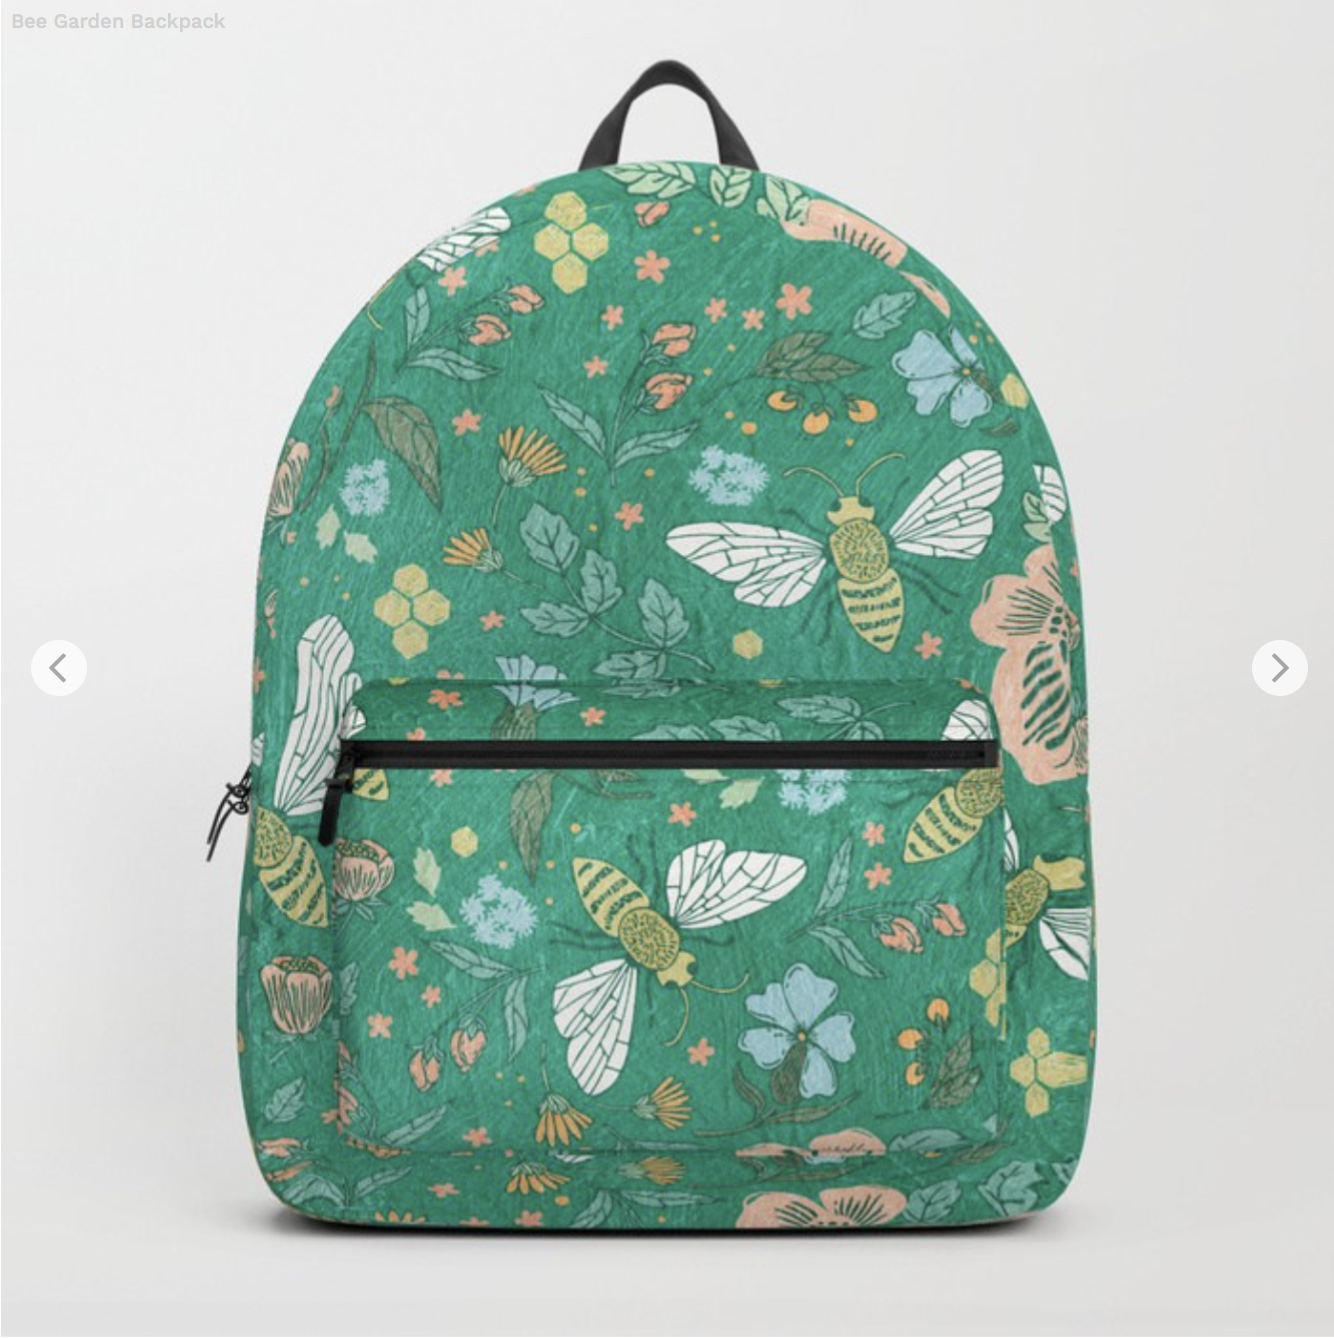
Bee Garden
Bees seem to have become a reoccurring theme in the artwork I produce and for a good reason, we need them to pollinate the gardens where our food grows. The more I learn about these fuzzy yellow insects, the more fascinated I become with them. And equal to my fascination is my concern for their well being.

I created this bee a few months ago to use in a pattern and I loved it so much that I turned it into a placement illustration.
Bees seem to have become a reoccurring theme in the artwork I produce and for a good reason, we need them to pollinate the gardens where our food grows. The more I learn about these fuzzy yellow insects, the more fascinated I become with them. And equal to my fascination is my concern for their well being.
As an artist, the easiest way for me to raise honey bee awareness is to draw or paint them and make my artwork available on products. When someone wears or displays my bee art I hope it will spark a conversation about how important these little creatures are and how much danger they are currently in.
There are a few very simple things anyone can do to help bees. If you have a yard, fill it with bee friendly plants. Bees love wildflowers such as cosmos or echinaceas (also known as cone flowers). If you prefer leafy foliage with fewer flowers you can plant hostas, just watch out for the deer and bunnies, they also enjoy hostas!
Another way to help bees is to pay close attention to the use chemicals commonly used in gardens. It may seem harmless to spray your rose bush with that bottle of beetle banishing spray you picked up from the garden store, but a quick glimpse at the long list of ingredients will almost immediately tell you otherwise. We can't immediately change the practices of big agriculture, but we can at least start with our own gardens. Chemicals used in most pesticides, herbicides and fungicides can transfer to the nectar that the bees drink and as a result poison them. Neem Oil is an all natural alternative that won't harm bees. You can also use it to make your own bug spray! Planting a barrier of fragrant plants such as rosemary and lavender will also help with pest control.
If you're interested in learning more from someone who knows way more than me, I recommend picking up a copy of The Bee Friendly Garden by Gretchen LeBuhn, available on Amazon.com. A good website to checkout is The Honey Bee Conservatory, a website that not only educates but also enables you to sponsor a hive or receive a sponsored hive. Pretty neat.
To support my artwork and to provoke honey bee conversations, this piece is available for purchase on different products in my Society6 shop. It's also available in different arrangements and standalone as a bee sticker among other things in my RedBubble shop.
If you've got a bee project of your own, I'd love to hear about it! Leave a note in the comments.


100 Days of Pollinators
Every year on April 3rd the 100 Day Project begins. The 100 Day Project is an international art project that anyone can participate in. It's truly an amazing adventure for all involved either by making art or following along. I've found that the 100 day project is an opportunity to grow as an artist and establish a solid routine.

Every year on April 3rd the 100 Day Project begins. The 100 Day Project is an international art project that anyone can participate in. It's truly an amazing adventure for all involved either by making art or following along. I've found that the 100 day project is an opportunity to grow as an artist and establish a solid routine.
I had no idea when I challenged myself to 100 days of pattern making a few years ago that it would be the beginning of what I can now call a career. Now I make patterns on almost a daily basis. 100 days of pattern led to hundreds of days of patterns and I couldn't be happier.
So fast forward to now and I've decided to jump on board with this year's challenge. I'm doing it a little differently this year. I've teamed up with Jill O'Connor who is the other half of Jack and Jillo. I'm one half, she's the other half. We make a great team. Anyway, we'll be working through this challenge together with each of us committing to create 50 pieces of art which will be displayed in our shared Instagram feed, @jack_and_jillo. We chose a theme that will help bring awareness to something we are both passionate about: Pollinators and their favorite flowers. Without pollinating insects our food can't grow and currently one of our most important pollinators, the honey bees, are having a rough time.
Throughout the duration of this challenge I hope to learn more about bees, the flowers they love and what we can do to help bees survive and thrive. I look forward to sharing what I learn with the world through the art that Jill and I create and my hope is that through our art we can make an impact.
Join the fun by following us on Instagram, you are also welcome to join in. We'll be using the hashtag #100daysofpollinatorsandflowers

My simple fix to creative block
Sometimes creative block gets the best of me and spins me into a day, sometimes a string of days of creative despair. Creative block is pretty terrible when it hits and it's a great feeling when it finally floats away. But where does it come from in the first place and why does it have to bother me when I have things to do?

Occasionally creative block gets the best of me and spins me into a day, sometimes a string of days of creative despair. Creative block is pretty terrible when it hits and it's a great feeling when it finally floats away. But where does it come from in the first place and why does it have to bother me when I have things to do? After all, art is how I earn my living.
I can't completely answer my question but this line I stumbled across from Steal Like an Artist by Austin Kleon makes a lot of sense, "Nothing is more paralyzing than the idea of limitless possibilities."
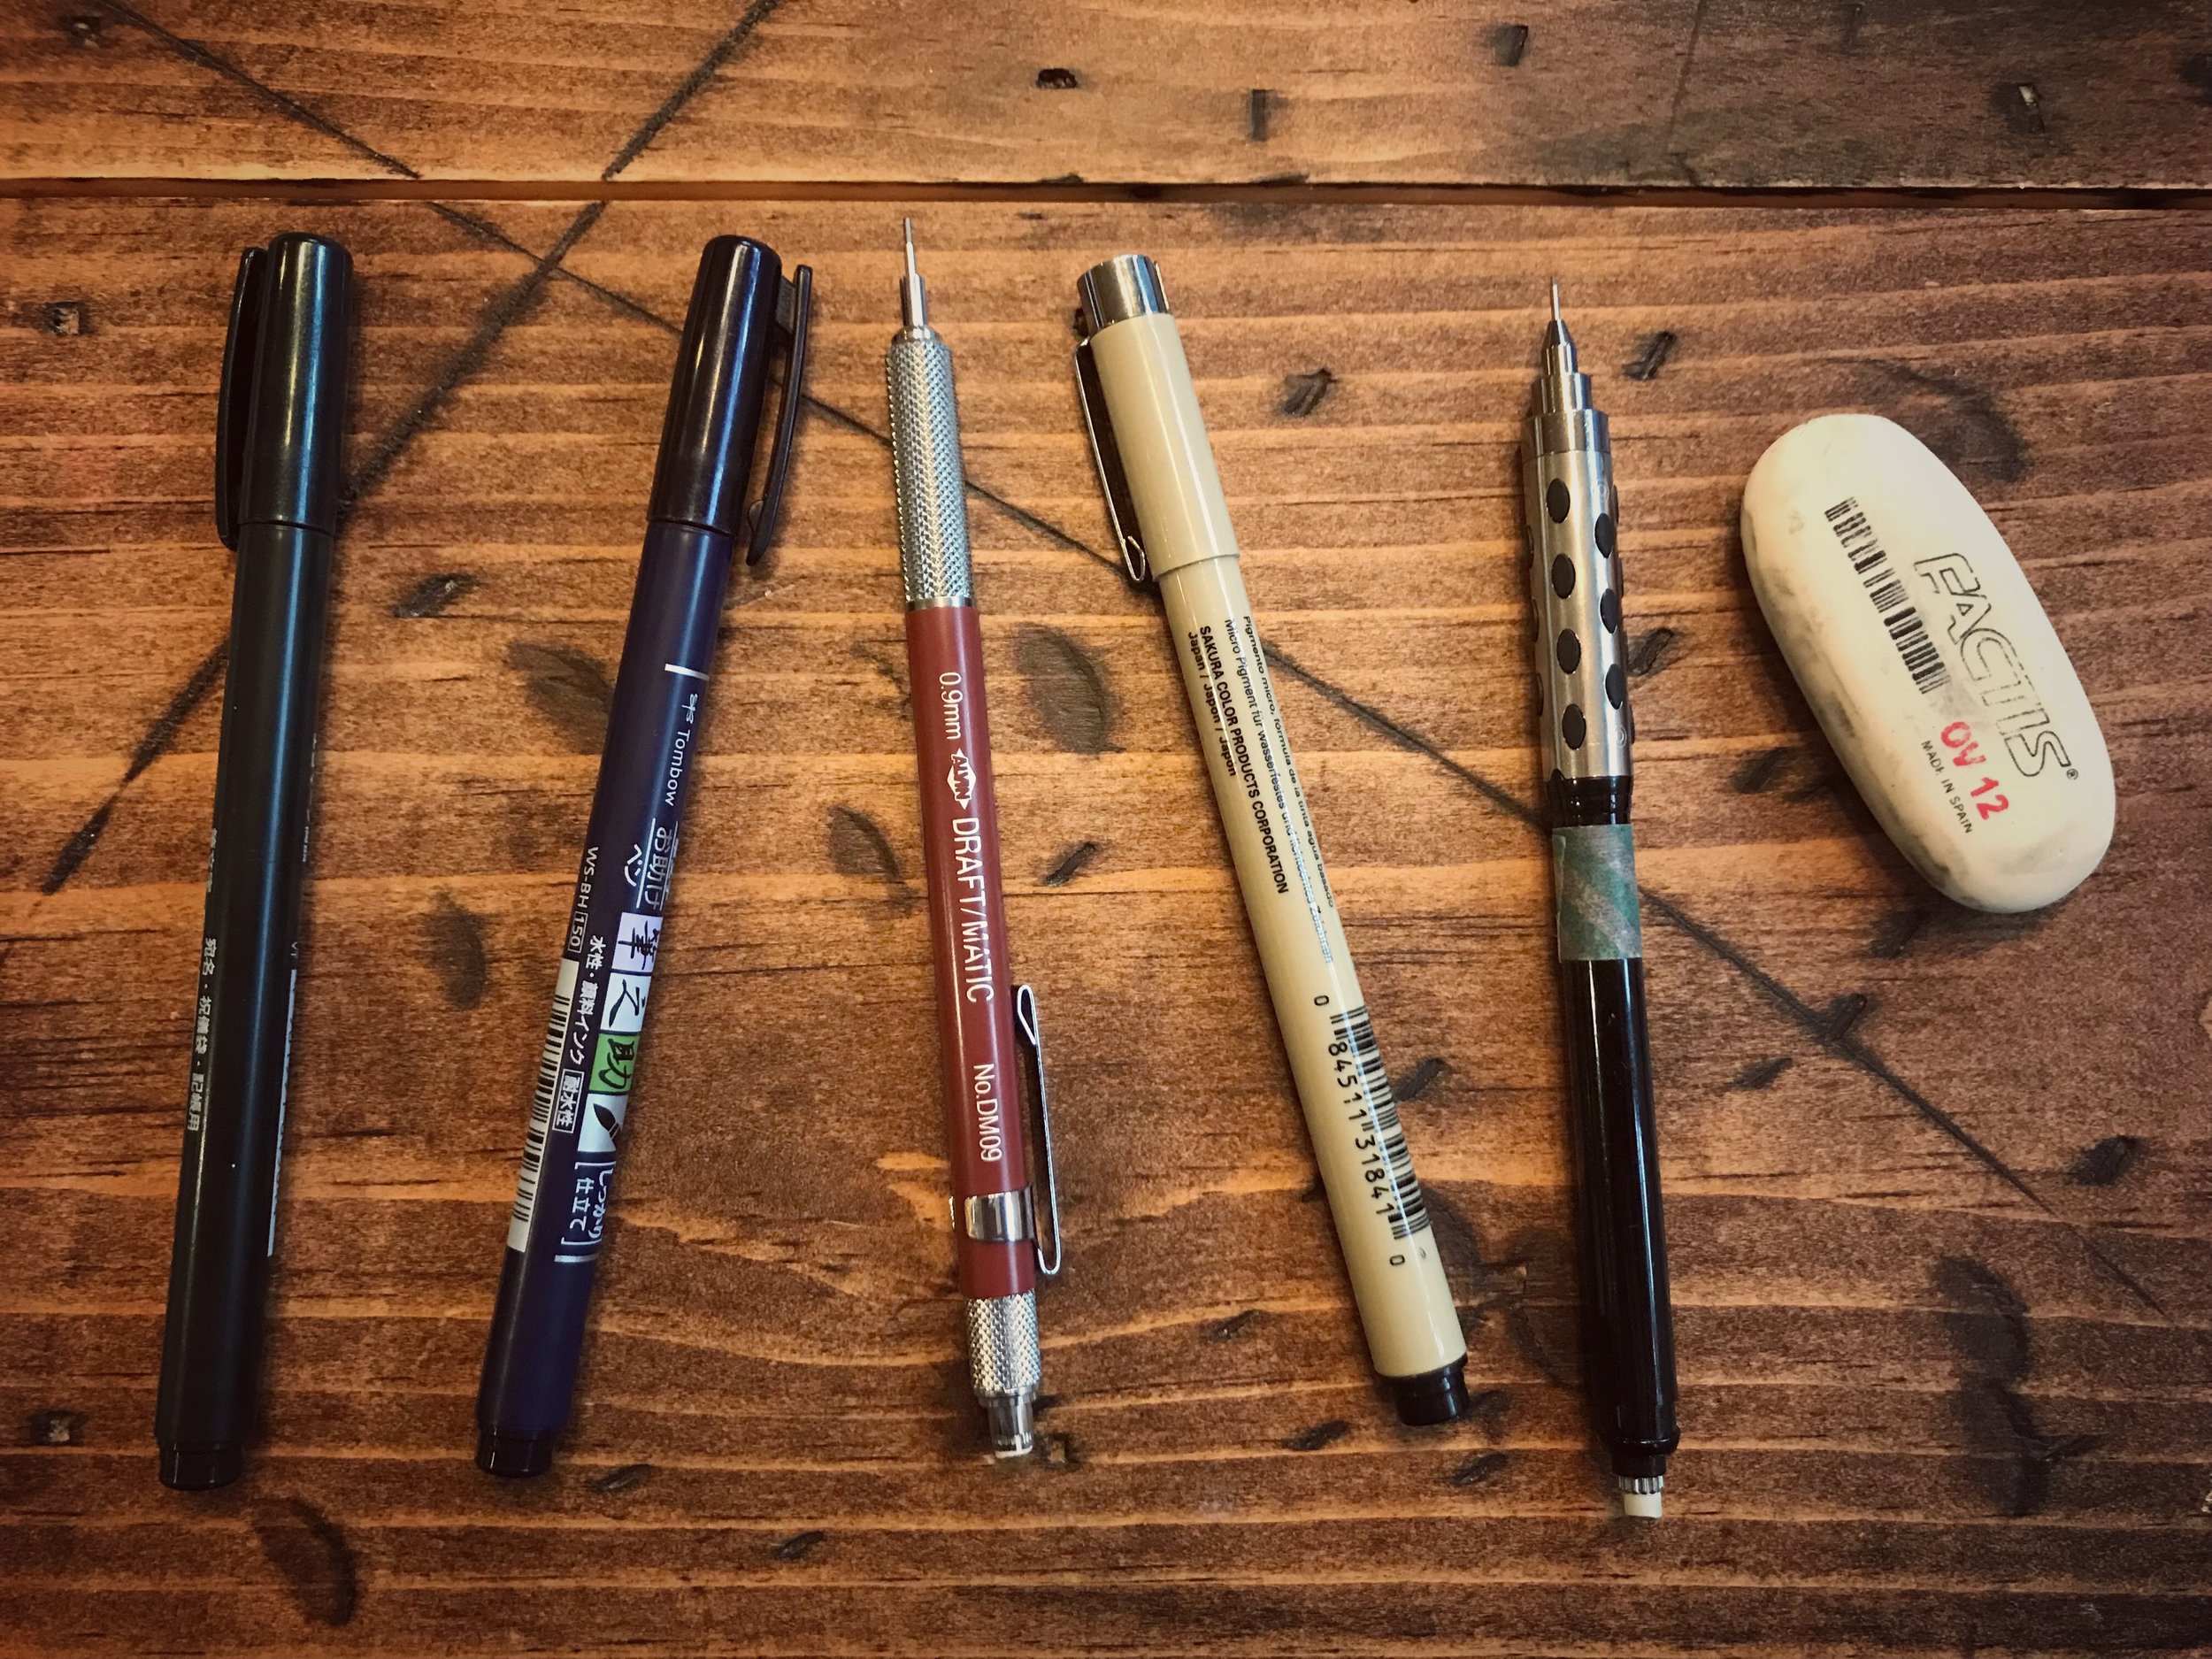
Some of my favorite go-to supplies. Tombow brush pens, Draft-Matic Mechanical Pencil, Pigma Micron Pen, Pentel Mechanical Pencil, General's oval eraser.
Too many possibilities... when I look at the days when I encounter creative block, I find it's on the days when my desk is the messiest, covered with paint tubes, markers, colored pencils, fancy new paper or whatever else I've decided to try to bring into my workflow that day. So this line makes a lot of sense, at least for me, and may be my biggest hang up when it comes to making art. There are so many options available. Too many options. It's an overload to my creative flow. I keep trying and wanting to bring in different mediums but I always default back to a pencil, a black pen and a Canson Mix Media sketchbook. Once I have eliminated everything else I feel free again. What works for me is so simple and effective that it almost seems too good to be true and I guess that's why I keep trying to change it up. When I have too many options I'm stuck. When I limit my tools I feel less overwhelmed and the quality of art I produce is what I'm the happiest with.
So if you find yourself stuck, my advice is to clear your workspace and take away everything but the basics. Once things start flowing you can always add things back in as space opens up for them.

A Sweet New Collection

Available for purchase on Spoonflower
It's about a week into August and I'm not sure where the summer went but that's ok. I'm kind of glad summer is almost over because it means things will start to slow down! In June my family and I started our moved back to North Carolina so for those who are wondering, yes, I am finally back in Southern Pines. I am thrilled to be home again and thankful that my schedule is finally back to normal.

Despite being super busy with the move and getting settled in, I've still managed to produce a good amount of artwork much of which I've turned into adorable patterns. As a result, I've got a lot of new designs available for purchase in my Spoonflower shop and more on the way.
My sales on Spoonflower have finally started picking up. I'm finally making enough to pay for my swatches which is awesome, it means I'm finally getting somewhere with this.
In my opinion, my latest collection, Sweet Piggies, is the best design I've done this summer. I'm extremely impressed with the quality of fabric swatches I received from Spoonflower, the colors are vibrant and the line quality is crisp. As with every design, these sweet piggies and their snacks started as a simple black and white doodle.


My Pig is Always Flying
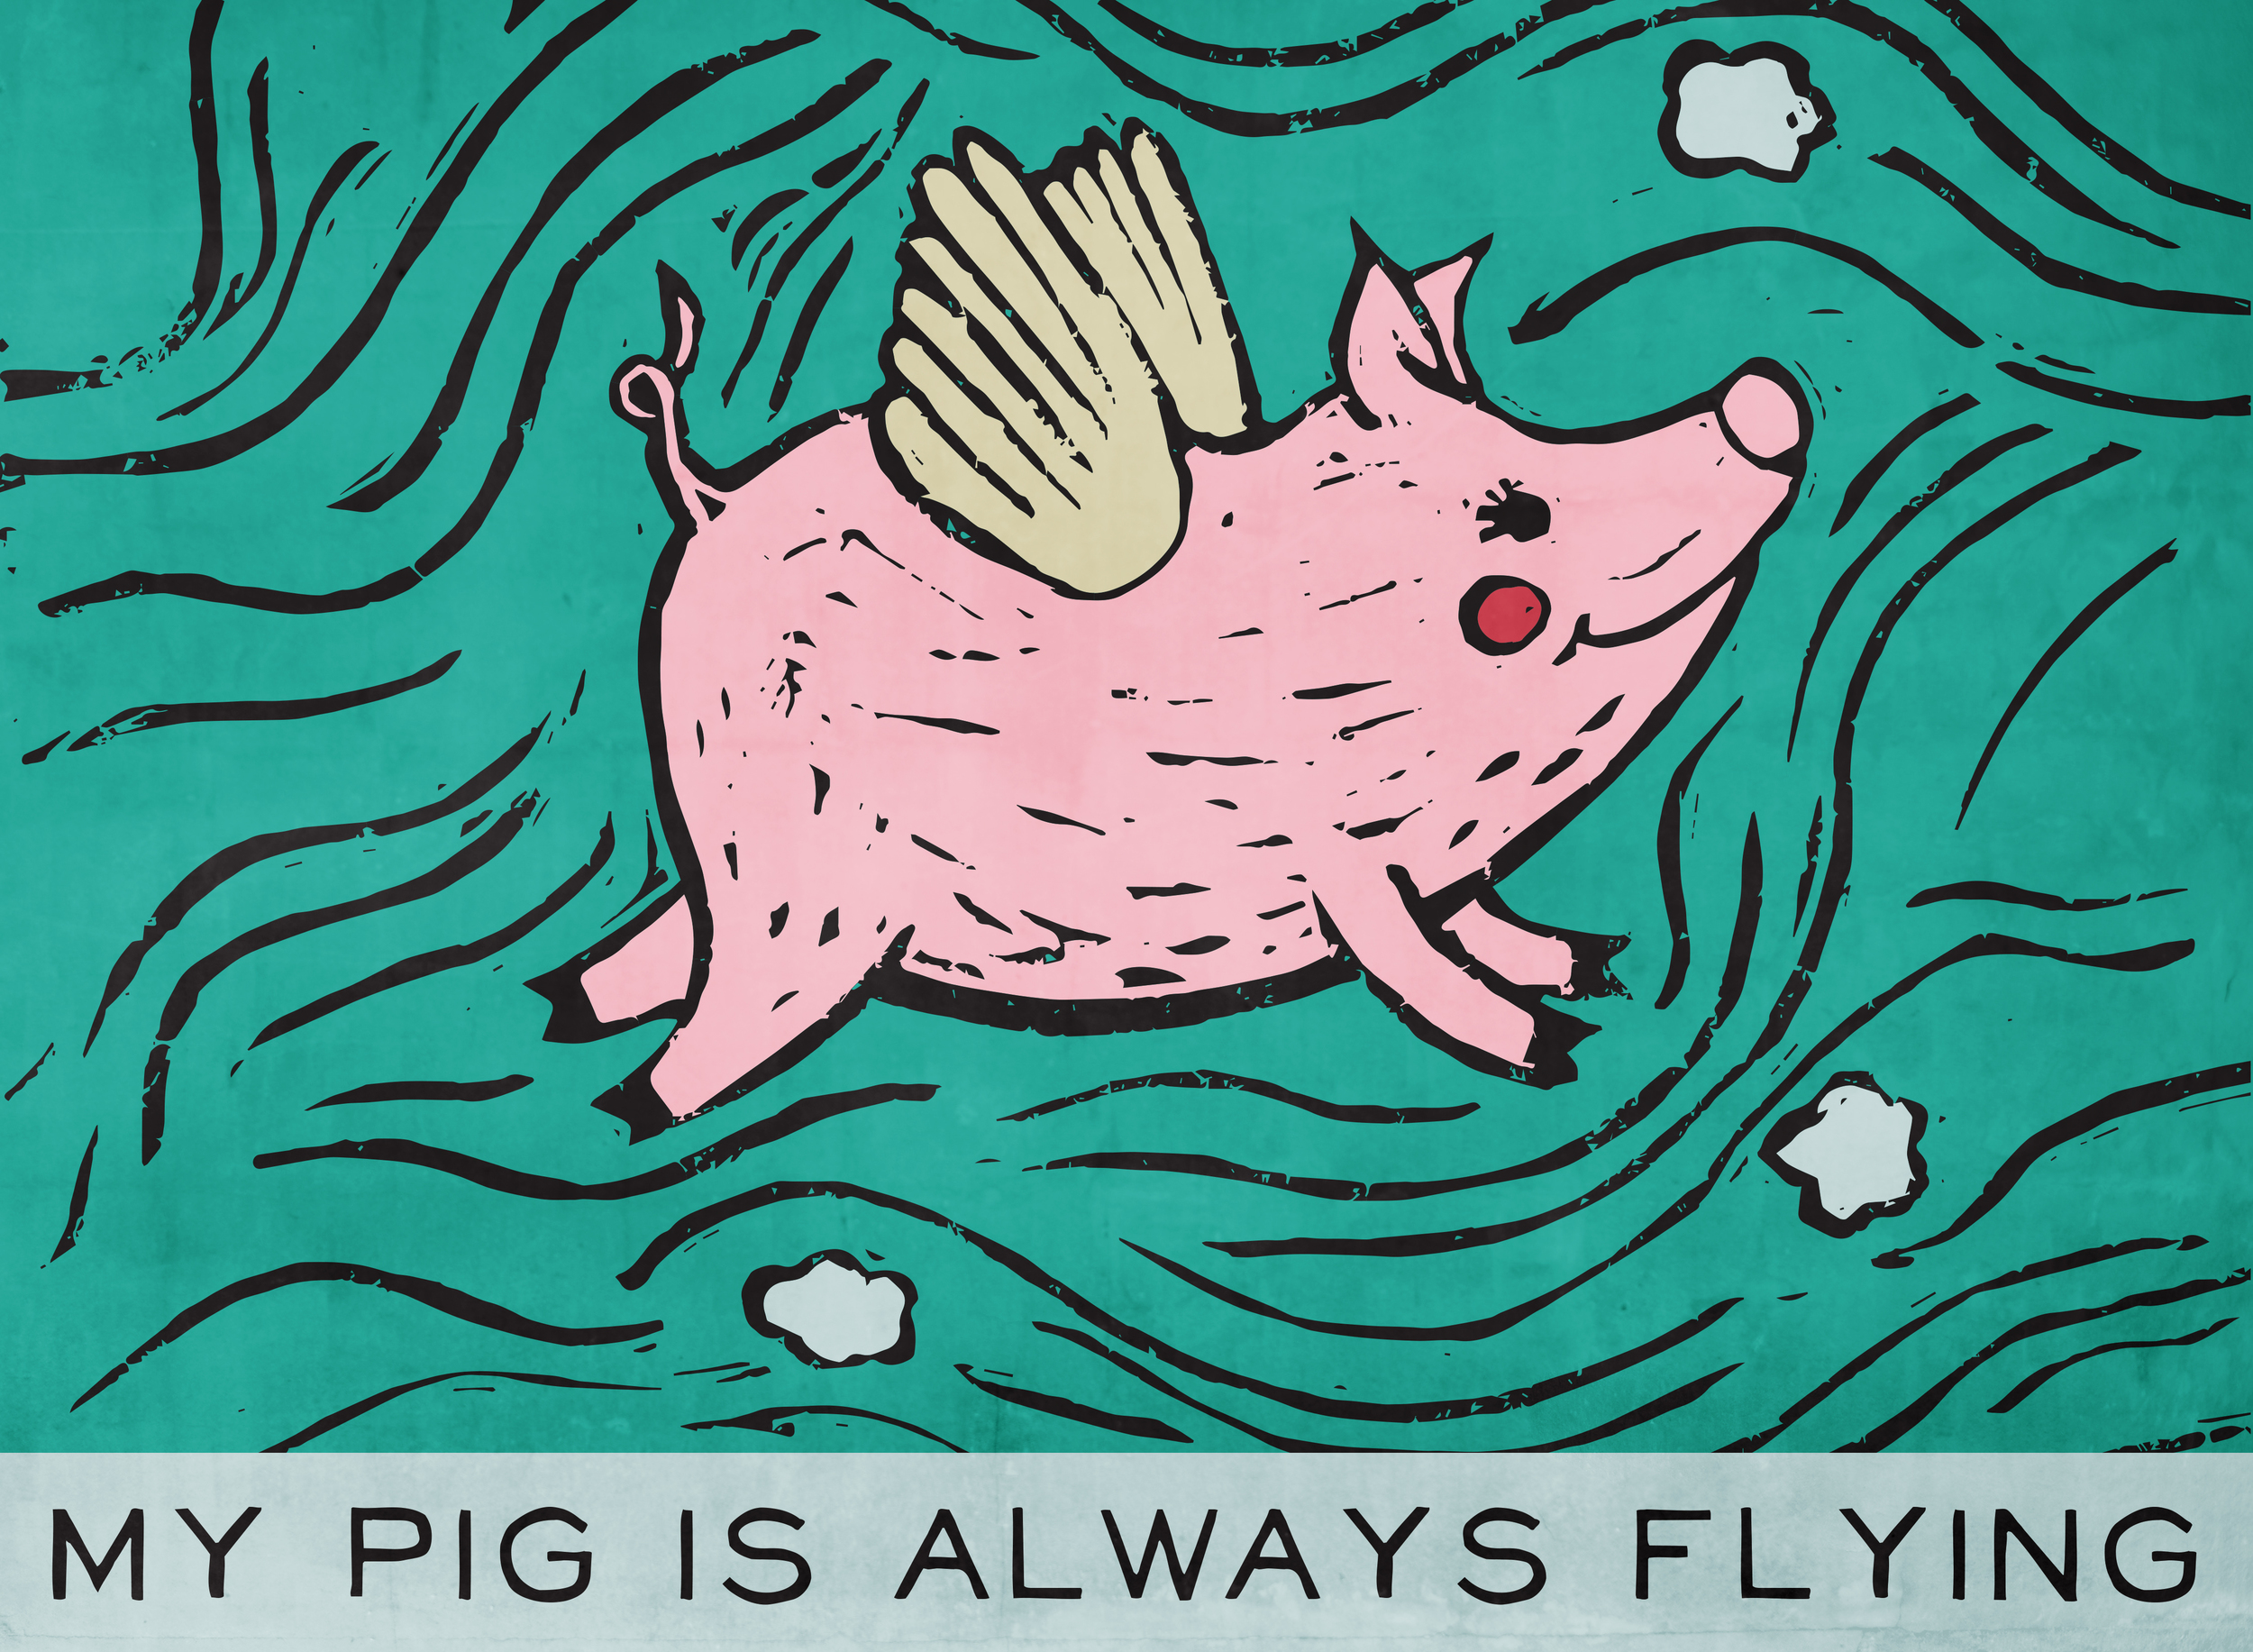
Carving a flying pig
See it on Spoonflower
The phrase "When pigs fly" is an idiom similar to "when hell freezes over". It's a funny but rather pessimistic phrase, however it's one of my favorites. To me the flying pig is a symbol that represents the opposite, it is a symbol of the possibilities that are born from the imagination. Pigs aren't supposed to fly, but here they are, I made them fly. With a little creativity we can make anything we imagine come to life in some shape or form, even if it's just on paper. That's the beauty in being able to create. So whatever your pig is, give it a set of wings and let it fly.
I carved this sweet flying pig on a 5x7 block of linoleum. Once it was done I digitized it and turned it into a pattern that will be available in two different colors by the end of June as a fabric, wallpaper or wrapping paper on Spoonflower.
The version of my flying pig pictured above with a blueish background is available as an art print, pillow, cell phone case and more in my Society6 shop. If you are interested in an actual linocut print, shoot me an email and I will put you on my waiting list. I will produce a limited number of flying pig prints once I get settled in to my new home in July and hopefully lots of other prints too. More to follow on my move in another post :)

Intro to Stamp Making
For anyone who's been following along over the past few weeks I've been exploring print making with hand carved stamps and lino-cuts for making patterns and other works of art. Today I'm mostly going to touch on stamp making. Stamp making on rubber is pretty simple, lino-cutting is a little more complicated only because linoleum can be pretty tough to carve. There are several different mediums that can be used besides rubber and linoleum but so far I've only explored those two. I'm finding that the linoleum is great for working on a print that's going to have a lot of detail, it also requires a bit more work to get a good print to include print making inks. Rubber is good for stamping and a simple ink pad is all that's needed to make a mark. I like to create rubber stamps if I need something quick and simple for a pattern I am working on.

My daughter Mia making a print with her very first hand-carved stamp
To get started I recommend using rubber first. You'll need some scrap paper, a pencil, a sharpie, a rubber speedy cut block and a Speedball linoleum cutter. These items can be purchased via the links on Amazon (free shipping with Prime) or you can stop by your local Hobby Lobby. Unfortunately Michael's doesn't carry block cutting supplies. Once you have your supplies in hand spend some time researching your ideas and drawing thumbnails. Start with something simple and remember that you'll need to put your design on your rubber in reverse, especially text, otherwise you'll end up with a backwards mess. The nice thing about the rubber and linoleum is that it takes well to pencil so sketch your design out first in pencil and then go over it with a sharpie if needed. When you are ready to carve, start with the V cutter, moving it carefully away from your body. The U tools are useful for carving out larger areas but with the Speedball tools I find the larger V tool gets the job done. When you are done carving just ink, stamp and repeat. It's that easy.
When I'm done with my stamps I usually bring the imprints I make with them into Adobe Illustrator and create patterns, that's just one of many ways to use hand-made stamps.
If you need a little more direction, here's a quick CreativeBug video on stamp making, you can sign up for a free trial if you don't already have an account with them. There are also plenty of good tutorials on YouTube and a few good books. A good and really pretty starter book is Making an Impression: Designing & Creating Artful Stamps, by Geninne Zlatkis.
Good luck and please let me know how it goes by leaving a comment! Be sure to sign up for my newsletter for upcoming posts and tutorials.